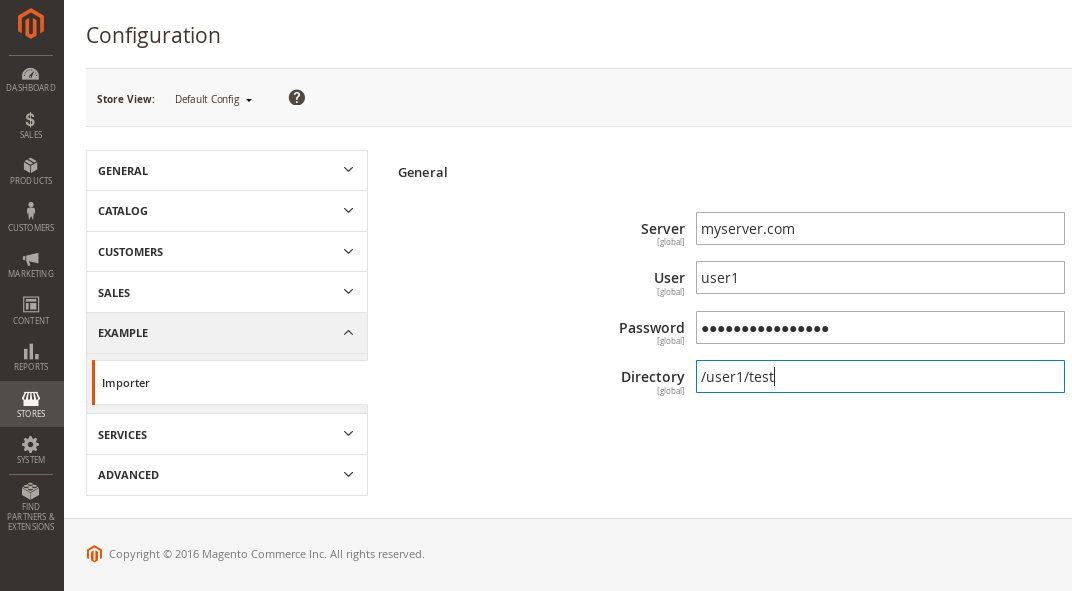
Magento 2 system configuration fields
In this tutorial I show you how to add your own Magento 2 system configuration fields to your backend. This is used to make some parts of your module editable by Magento shop admin. This was done in Magento 1 by etc/system.xml. Magento 2 uses also a system.xml file, but the source is a bit different.

Magento 2 system configuration fields
I assume, that you are already working on a Magento 2 module. If not, see my recent post on how to use a module creator to get a basic module with no function. We will now add files to get system configuration fields into your Magento backend. System configuration fields are stored in database. You can find them in your core_config_data table, this is exactly the same as in Magento 1.
In this example I create four new fields for my importer module where a shop admin can setup FTP connection details. I need this fileds:0
- server
a domain or an IP address of a remote server - user
a valid FTP username - password
a password that belongs to this user - path
a path where my importer will find files to import
My importer module will import all files under this path from an external server. All this fields are simple text field with one exception. For password we will use password field so your password is not plain text readable.
acl.xml
First of all we add a new acl.xml file into our module etc folder. With this xml configuration file we can define a role resource for our modules system configuration. This is needed if you want to give different users different access to your module and your modules system configurations. ACL means access control list! For my small module I created the following acl.xml file:
1 2 3 4 5 6 7 8 9 10 11 12 13 14 15 16 | <?xml version="1.0"?> <config xmlns:xsi="http://www.w3.org/2001/XMLSchema-instance" xsi:noNamespaceSchemaLocation="urn:magento:framework:Acl/etc/acl.xsd"> <acl> <resources> <resource id="Magento_Backend::admin"> <resource id="Magento_Backend::stores"> <resource id="Magento_Backend::stores_settings"> <resource id="Magento_Config::config"> <resource id="Example_Importer::config" title="Importer" sortOrder="50" /> </resource> </resource> </resource> </resource> </resources> </acl> </config> |
This will create a resource for Example_Importer (please change that to your own Vendorname_Extensionname) with the title Importer. You will see this under System -> User Roles. Click on one rule and in tab “Role Resources” you see the following tree element:

system.xml
Now its time to add our system configuration fields. For this we create a new file called system.xml under etc/adminhtml module directory. I created it with the following lines fo xml code:
1 2 3 4 5 6 7 8 9 10 11 12 13 14 15 16 17 18 19 20 21 22 23 24 25 26 27 28 | <?xml version="1.0"?> <config xmlns:xsi="http://www.w3.org/2001/XMLSchema-instance" xsi:noNamespaceSchemaLocation="urn:magento:module:Magento_Config:etc/system_file.xsd"> <system> <tab id="mstage_tab" translate="label" sortOrder="1000"> <label>Example</label> </tab> <section id="example_section" translate="label" type="text" sortOrder="100" showInDefault="1" showInWebsite="1" showInStore="1"> <label>Importer</label> <tab>mstage_tab</tab> <resource>Mstage_Importer::config</resource> <group id="general" translate="label" type="text" sortOrder="10" showInDefault="1" showInWebsite="1" showInStore="1"> <label>General</label> <field id="ftp_server" translate="label" type="text" sortOrder="20" showInDefault="1"> <label>Server</label> </field> <field id="ftp_user" translate="label" type="text" sortOrder="20" showInDefault="1"> <label>User</label> </field> <field id="ftp_password" translate="label" type="password" sortOrder="20" showInDefault="1"> <label>Password</label> </field> <field id="ftp_dir" translate="label" type="text" sortOrder="20" showInDefault="1"> <label>Directory</label> </field> </group> </section> </system> </config> |
It is a good idea to create a tab for your vendor name where you put all your modules to. For this module I create a submenu Importer with only one general group. This group holds all relevant FTP fields. Input fields are very easy to configure, they only need a label. Your field tag has the following attributes:
- id
this is the ID for the field. You need it to get the value by code. So define a usefull name like you name variables. - type
this is the type of the field. For simple text inputs this is “text”, for password fields you can use “password” - showInDefault
if set to 1, the field will be in global scope. The setting is shown as small hint in your backend. - showInWebsite
if set to 1, the field will can be changed by website - showInStore
if set to 1, the field will can be changed by storeview
Conclusion
It is quite simple to create a Stores->Configuration tab for your module with input fields to customize your module.


